Don't forget! I am giving away some goodies here TODAY:

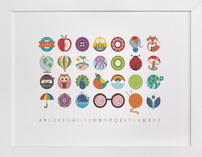
New items are up in my Esty shop! There is the Insect Number Poster that I debuted a few days ago. And then I thought the girls out there needed a little something for their walls, hence the addition of My Forest Friends Alphabet Poster. Wes still argues that J for Joy and G for Gnome don't really work. But I insist that I may or may not have seen (or didn't see) a real, actual Gnome in the forest once. And he was my friend. And when you look up "sunshine" in a thesaurus, "joy" is right there on the page. So that settles it. And the poster just isn't the same without a gnome with a walking stick and a jovial sun, right? A few smaller, 8x8 prints are also new to the shop. Check them out if you are so inclined:


I thought I would share how I create my posters. Here are some terms you will need to know:
Vector graphic: Vector graphics are drawn in paths. This allows the designer to resize images freely without getting pixilated edges as is the case with bitmapped, or Raster, images. The vector format is generally used for printing, while the rasterized format is used for onscreen display. Photoshop uses raster images, Illustrator uses vector.
Wacom tablet: A digital tablet that utilizes a pen tool to "draw" on the surface. The pen communicates with your computer similar to, and instead of, a mouse. Some illustrators prefer to work with this type of tool (I don't, however).
Stock Art: Licensed Illustration and Photography which can be purchased for use in personal and commercial design, illustration, and publishing projects. An example if this is iStockPhoto.
Live Trace tool: A feature in Illustrator that allows you to take an image, and with the click of a button, trace it and transform it into a vector graphic. Very useful, but rarely extremely exact.
Stroke and Fill: When a graphic is created in Illustrator, a "stroke" (or line) of varying size, brush style, and color can be added to the edge of the graphic. The "fill" is the color filled into the center of the graphic itself. Both stroke and fill can be a color, or set to "none" (empty).
Paint Bucket tool: In Photoshop, the paint bucket tool is used to fill areas of a graphic or image with color (equivalent to the "Fill" in Illustrator).
Pen Tool: The primary drawing tool in Illustrator. This tool uses a series of dots and handles created by clicking the mouse, making a "path." Each dot along the path can then be selected and moved. The handles can be adjusted to control the slope of a smooth or curved edge. The entire shape can even be smoothed with the Smooth tool, to achieve a very fluid vector shape. Edges can also be puckered, bloated, and manipulated to look rough, wavy, or even zigzagged.

I minored in Digital Illustration in grad school, and I had an amazing professor at RIT. He really helped me steer my illustration in a direction that was very "me". And it strengthened my design projects, as well, because I was able to combine the two skills. It's still one of my favorite ways to work. When I am in a bind, I'll sometimes purchase stock illustrations to complete a design, but I usually prefer to illustrate them myself. And all of the illustrations in my Etsy shop have been personally illustrated. Both the Forest Friends Alphabet and Oceanic Alphabet posters were illustrated entirely in Illustrator (my favorite method). I use the pen tool (not a Wacom tablet with a pen, but the actual pen tool in the Illustrator toolbox, and my mouse). I adjust stroke and fill all in Illustrator, as well. Sometimes I use Live Trace, but usually I prefer to use the pen tool to click and trace around the edge of something (if I am copying a photo of a flower or animal, for example), so that I can control the outer border. I'm a stickler for that. I hate a sloppy Illustrator vector, especially a silhouette!
Once I know what I want to illustrate, I do a google image search. I am not always great at illustrating directly from my imagination/memory. Usually I have to look at the real deal, then convert it into something whimsical (examples of this are flowers and animals). If I am really unfamiliar with how I would translate something into a vector graphic, I will generally look up other artist's illustrations, to see how they did it. The Toad is a great example of this. I knew I needed froggy feet, but couldn't visualize them as a vector. So I looked some up, and was able to combine the toad's body that I had already drawn, with the feet I was using for visual inspiration (looking at the online version, I drew a similar version in Illustrator). And while I might use a design as inspiration, I would never download someone else's and try to pass it off as my own. There are so many illustrators right now that have a style similar to mine, so I often find lots of designs very similar to what I do. And I have to be careful to just emulate, and not inadvertently copy something too closely. If you ever use an illustrator's or photographer's artwork in your layout or design, make sure you either give appropriate credit, or purchase the correct stock license that allows for personal or commerical use. There is also a general rule that if you do closely copy a graphic, it must be changed 20%. This excludes logos or branding—never copy or recreate a logo, even with a few small changes. You'll get in a heap of trouble if you do.
Here are a few examples of images I used for inspiration, and my interpretations: (notice the froggy feet I mentioned)
Their feet: My feet:

Their version: My version:

The Insect Numbers Poster has a slightly different illustration style—all hand drawn for the insects, then digitally colored using Photoshop. It's a great technique if you ever want to give illustration a shot! You just doodle with a very fine tip black pen, then scan it in. In Photoshop, change it to Grayscale, then adjust the levels so that it's crisp black and white (this will thicken the line a bit, hence the need for the very fine tip pen). Then you fill everything in with the paintbucket tool. I made sure to draw the characters so that there were no gaps in the illustrated lines, so that when I clicked the area with the paintbucket tool, the color didn't spread to the entire background. Then I selected each graphic with the Marquee Tool, and moved them around. The Text tool was used for the large numbers. I moved each insect around in its own layer to complete the design, integrating the characters with the numbers.
Hope you enjoy the designs! If you have any questions about my design process, or how to get started yourself, clock over there at the left to send me an e-mail.


No Comments Yet, Leave Yours!
This is such an awesome post! I'll never have the time or patience to learn how to do that. But I'm OK with leaving it to the experts like you!
Love the girly alphabet poster. So cute.
-c
love them!
Lyndsay, I love all of the stuff in your shop. You are so talented, and thank you for sharing how you do it. You are amazing! Thank goodness there are creative people like you out there.
That was SOOO informative. I've been wondering how to transfer a drawn image to Photoshop and color it. I wish you could teach classes somewhere. I would definitely enroll. Maybe some day?
Great post. As a designer myself, I heart Illustrator most of all. Photoshop comes in a lovely second:) Love your design style, it's uniquely you.
wow you're so talented. glad to have found your site! as a designer i don't copy ANYTHING because i'm so afraid of copyright laws for some reason! it's good to know that if it's changed 20% though it's yours. really really great information to know.
i also agree, you should teach an online class!
Post a Comment