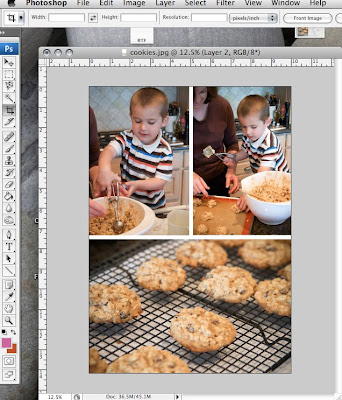
So I created a How-To video. Bear with me on this one. I literally just got home from Texas, and sat down and filmed this video. I am pretty delirious. I've been up since 5:30. So I say some odd things, and there are some really good "Uuuuummmmm" moments. But in the end, it all works out. ;)
For those of you that would like to know how I group, or collage, my photos before posting, view the video HERE. If anyone knows of another way to do this not using Photoshop, let me know, and I will post if for my non-Photoshop-using readers.
Then to find out how I post LARGE photos in my layout, view THIS How-To.
And if you need to widen your layout to post larger photos, see THIS video.
Glad to be home. Still more photos to come from The Lone Star State. But for tonight, I'm signing off.
***********
Click on photos below to enlarge.
I had a few questions in my inbox last night and this morning, so I thought I would revise this post a bit. Here is another way to group/collage your photos. I started with the largest photo of the group in the example below.
Another very effective way I sometimes achieve this same result, is to start with a blank layout altogether. Just open a new file, with a blank white background. Then drag and scale all of your photos in the blank canvas. You will be able to move the layers around, and change the order of your photos, as well. You can alway change your canvas size to be larger if you need more space. It won't effect the resolution/quality of your photos to enlarge your canvas size.
Another very effective way I sometimes achieve this same result, is to start with a blank layout altogether. Just open a new file, with a blank white background. Then drag and scale all of your photos in the blank canvas. You will be able to move the layers around, and change the order of your photos, as well. You can alway change your canvas size to be larger if you need more space. It won't effect the resolution/quality of your photos to enlarge your canvas size.
Click on photos below to enlarge.
Step 1: Open the WIDEST of the photos in the group/collage:

Step 3: Resize your canvas size from the bottom up.
I allowed for 15 inches in height, a little more than double the height of the original photo:

Step 4: Drag your other photos into the blank space that is now in the canvas above the original photo:
 NOTE: You might have to fudge things and make the smaller photos you bring into the canvas a little larger or smaller by scaling them. It should not make that much of a difference on screen in terms of resolution if you scale them UP a tiny bit. But if you are concerned about printed resolution, it's best to start with all the images rather large, and scaling them DOWN by hand once you drag them into the canvas.
Don't fully understand what I mean by web and print resolution? Don't quite get why you can't scale UP? Read more HERE.


No Comments Yet, Leave Yours!
Thanks so much for sharing these tid bits! I loved your widening blog tutorial and have really enjoyed the larger space! Funny you should post the college How-To. I was just beating my head trying to master this project with corel and still can not quite get it. Can you do a collage using photo bucket? I thought I saw one on Nie Nie's blog and you could click on each individual photo to enlarge? I really enjoy your blog! Thanks again!
Welcome home! Really wishing I was your neighbor. I'd be running over to your house as soon as I saw you drive in....that's how much I have missed you!
Great job! Didn't hear anything odd. :)
Any chance you'll do a tutorial using PS brushes? Nothing makes me want to bang my head against my keyboard more than BRUSHES!
-c
Hi Lyndsay! I'm sure you know this already, another option is Photobucket. They now offers collage (you can choose number of images and layout) They will upload it right to blogger too!
xo
Michelle
Post a Comment